
Painting Your 3D Prints: Best Practices
Start with a Good Design
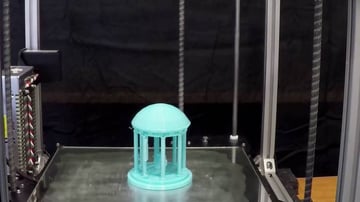
Considering that your final prints are seldom display room prepared, you in some cases need to rely on a little post-processing to take a model the final mile.
In this guide, we cover the fundamentals of painting PLA and ABS 3D prints, from smoothing to the real painting procedure, while offering some practical pointers in between. Here, we opt for spray painting over the use of a brush or airbrush since it's less tiresome and fairly economical as will be discussed later.
Now, let's get artsy!
Which Paint to Use:
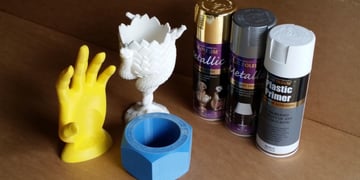
Paints can fall under various categories based upon their solvent. The most common ones are oils, enamels, lacquers, and acrylics, the majority of which will work well with both ABS and PLA. As a novice, you 'd be smart to stick to acrylic paints given that they dry quick and can be cleaned up with water.
Usually, you need to decide whether you're going to use an airbrush, a brush, or canned spray paint. While a brush is more affordable compared to the other alternatives, it can be hard to achieve an even coat of paint, with noticeable blobs in some spots and the underlying color appearing in others. An airbrush, on the other hand, is costly and generally has a high learning curve.
This leaves us with spray paints, which strike a tidy balance in between cost and ease of use.
Smoothing
Pre-sanding
This is considered the first stage, and it involves cutting rough print functions, such as assistance stubs, before sanding.
You can utilize some of the following in this phase:
Craft knife (Exacto knife).
Sandpaper.
Tweezers.
Toothbrush.
Pliers.
The secret is to get rid of any protrusions and make sure the print is tidy. You can remove supports with your bare hands, or you can use a knife. It doesn't matter, as long as the result does not have bumps or protrusions.
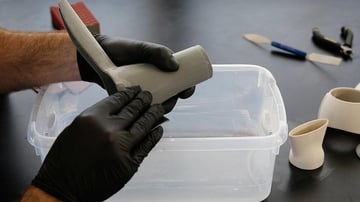
Sanding
Begin with 120-grit sandpaper and work your method up. The higher the grit number, the finer the sandpaper. Usage circular motions to prevent noticeable scratches, and pay more attention to the sides while preventing the edges, corners, and any other great details. 120 grit can be too strong for small details.
Sanding smoothens deformities and can be lengthy depending on the size of the print or complete you are aiming for. Sand down the support marks and make certain you've removed any filing or tooling marks.
Progress through the grits depending upon your print, once you're finished with 200 grit, start utilizing water. This avoids blocking and provides a finer finish.
While sanding, feel the surface area of the print at periods to get a concept of how smooth it is. When the smoothness is to your liking, use a brush and water to wash away any trapped dust. Naturally, you'll wish to let the print dry before carrying on to the next actions.
Take a look at our novices' guide to smoothing PLA if you need more gritty details on this procedure.
Priming
Priming turns your 3D print into a professional item and makes the painting procedure effortless by producing a flawless last surface area. Priming is required due to the fact that paints will never ever hide all the flaws, specifically when you're aiming for a near-perfect item.
Opt for a primer that works with your plastic. We prefer utilizing a spray-on guide because it can quickly cover the whole surface area with an even finish. This is various from brush-on primers, which are better for great touch-ups.
Application Steps.
Mix the guide: The goal is to liquify the pigment into the solvent by swirling the spray guide in a circular movement for a couple of minutes. Swirl until you hear the mixing ball (in some cases called "pea") rolling inside the can. Prevent shaking as it can cause bubbles to form when the coat is sprayed.
Spray the very first coat: Hold the spray roughly 10-12 inches from the part and spray in other words, rapid strokes. Turn the part as you spray. You wish to install your design onto a makeshift assistance to facilitate the spraying procedure. Likewise, do not let the spray pool on the part.
Inspect the very first coat: Check if any locations need additional sanding or filing. If sanding is required, you will need to wipe the dust again prior to respraying. You might need to alternate between sanding and spraying with primer until you get a smooth surface.
If needed, utilize area putty to reconstruct acnes. You can apply it utilizing a scraper. Spread it across the surface area of the part to fill the gaps, however be careful not to lose detail. When your print is well-covered, wait about 15 minutes until it has treated, then begin sanding.
Spray the final coat: Add another layer using rapid strokes and keep it light. Avoid including a thick coat as it will fill the fine information. The best method is to always sweep throughout the part with quick and fast bursts. This method prevents the paint from developing and leaking.
Allow your guide to dry prior to adding extra layers. Normally, two layers suffice for a clean surface finish.
The very first 2 coats must be extremely light because we're only using it to improve adhesion for the successive layers. But since a primer is enough to improve the surface area finish and the aesthetic of the printed part, some people choose to use a guide without even doing any extra painting.
After your final primer coat is added, your part is now ready for painting.
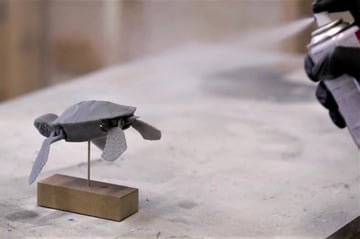
Painting

At this moment, you must have a mental image of the finish you're attempting to attain. The painting procedure is rather similar to priming.
You'll need the following:.
Painter's tape: Painter's tape sticks securely to surfaces yet comes off easily. This tape will be used to mask some locations of the printed parts to prevent the paint from permeating beneath.
Use a hard things, like a charge card, to force the tape into the creases of your design.
Spray paint: Tamiya spray paints are extremely suggested since they can be found in a range of colors and finishes, and they match plastic.
Application Steps
Apply the first coats: Hold the nozzle near the turning design and move quickly. You can begin with two light coats and finish with 3 or four damp passes, waiting 5 to 10 minutes in between to prevent sagging.
If you want to continue fine-tuning the surface, you may buff and polish the paint surface to preserve a smooth surface area that will look shiny under the clear coat, but this is optional.
Include topcoats: Mask the appropriate locations to maintain details and include the overcoats. Think about overcoats as layers over the previous coats. The first and second coats will reveal more if the overcoat is thinner, however in between applications, let the paint sit for a number of minutes and observe if the color is filled enough.
(Optional) Finish with a clear coat: This is suggested to "seal" the painted model, securing the paint surface and achieving the wanted shine. Apply the clear coat in a couple of thin and even layers, waiting on about 10 minutes between applications. At this point, your painting is done, but you can still polish it even more with wax or a fine polishing substance if you want an incredibly glossy finish.
Let the paint dry overnight and tidy the part the next day utilizing a tack cloth.
Some things to remember:
Masking: Remove the tape right after masking to make sure you have clean, sharp edges between colors. Do not stress over covering the mask as the tape is expected to prevent any paint from permeating through.
Coat: A very first coat blocks the neutral color of your guide and is recommended when you desire rich color. Generally, white is a perfect very first coat for light colors, while black is best for darker tones.
Topcoats: Topcoats are optional, and when you apply a contrasting color, you will have the ability to create gradients of abundant color blends. If you want the very first and 2nd coats to reveal, go easy on the topcoat.
Layering: Most intricate parts are painted in a number of layers, starting with the first coat, which acts as the structure for the painted design. Note that there are a number of tweaks you can make if you want to highlight information, develop reflections, or get a weathered look.
Crucial Spray-Painting Tips
Below are some basic pieces of suggestions to boost the above steps:
Painting ought to be performed in a controlled environment with no wind or drafts. Keep in mind that even the slightest motion of air can alter the direction of the paint particles.
Complete spray painting in a single session if you want the paint to spread out equally.
Any products in the spraying zone distance require to be covered, as tiny specks of the paint can get on them. Alternatively, you can spray while holding the piece inside a cardboard enclosure. This assists to protect the environments from paint, and the painted product will be sheltered from dust while it dries.
Don't spray too near to your print or you'll wind up with visible drips.
Several coats are better than one coat, however keep each coat light.
A technique is to mount your model on a dowel by utilizing an existing hole in the part. This makes it much easier to maneuver while spraying and will enable you to access all the nooks and crannies without leaving fingerprints.
Figure out where your painted part is going to stand because it requires a long time to dry. Moving the design while it's drying is not an excellent idea.
Spray paints are hazardous. They are hazardous and flammable, and they can be damaging when breathed in.
It's best to use suitable clothes, rubber gloves, and a respirator to be safe.
Painting should not simply be an afterthought-- consider it as early as the design stage. It's best to experiment to find what works best for you given that there are many different impacts you can accomplish.